Write Cheques
Write A Cheque
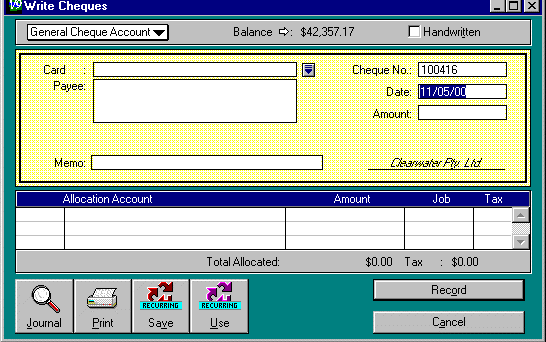
Click on the Chequebook command centre and on the Write Cheques function. The Write Cheques window will be displayed.
Fill in the fields displayed.
Click in the field showing General Cheque Account . A list of your accounts that were specified as detail cheque accounts or detail credit card accounts will be displayed. Select the account that the cheque is to be paid from.
Balance:
This shows the current balance of the selected cheque or credit card account.
Click on the white arrow to display the
Account Inquiry
window (see
Inquiry
in
General Ledger Analyst
for more detail).
Handwritten: Click in this box if the cheque is not going to be printed from MYOB. M.Y.O.B. considers this cheque to be already printed.
Card:
Click on the down arrow to the right of this field to bring up a list of your
suppliers, customers and employees. Select a name from the list and click
Use Card.
M.Y.O.B. will fill in the
Payee
details for you.
If the payee is not on the list, click on
New
to add them to your card file. Then select the payee from the list and click
on
Use Card
. M.Y.O.B. will fill in the
Payee
details for you.
Selecting a payee this way links the cheque to the payee's card file. This
means that this transaction will show up when you search by card in the
Inquiry
function.
Press TAB to skip this field if you do not want to link this transaction to a
card file.
Payee: Enter the payee details here if you have not linked the cheque to a card file.
Memo: Enter a description of what the cheque is for.
Cheque Number:
The cheque number is created by M.Y.O.B. It is increased by one every time you
write a cheque.
You can delete the default cheque number and enter another number if you wish.
You may wish to have the cheque number match the cheque number in your cheque
book if you are hand writing your cheques.
For bank fees etc, enter a description instead of the cheque number eg ATM
Fees. (Note: If you do not wish to do this, use a General Journal entry to
credit your cheque account and debit the destination account (eg Bank Fees
Expense) to record these transactions).
M.Y.O.B. allows duplicate cheque numbers. This is NOT recommended. You can
set M.Y.O.B. to warn of duplicate cheque numbers (see the
Preferences
section). This will slow down the recording of cheques.
Date: M.Y.O.B. automatically sets this field to today's date. Delete this and enter the date of the cheque if necessary. You can not enter a date before your conversion date or a date of any previous financial years. If you enter a date in the future, M.Y.O.B. will accept it but will warn you that this date is probably wrong.
Amount: Enter the amount of the cheque. If you like you can leave this field blank. Enter all the allocation amounts and then click on the Amount field. M.Y.O.B. will fill it in as the total of all the allocation amounts. The cheque or credit card account you selected will be decreased by this amount.
Allocation Account:
These are the accounts that the money paid is related to. For example, if
the cheque is to a supplier, the related account will be the accounts payable
account for that supplier.
Press TAB to display the account list. Click on the account you want to use
(it will become highlighted). Click on the
Use Account
button. The account number and name will appear in the
Write Cheques
window
Amount: This is the amount that is to go to the allocation account. M.Y.O.B. will put the balance of the cheque amount in this field. Change it if necessary.
Click on
Record
to record the cheque in M.Y.O.B.
The total of the amounts allocated must equal the cheque amount before you can
record the transaction.
If you make a major mistake while you are writing out the cheque, choose Erase Cheque Transaction from the Edit menu to erase all the fields.