Changing the Way Your Desktop Looks
- Double click on the Display icon to show the Display Properties dialog box
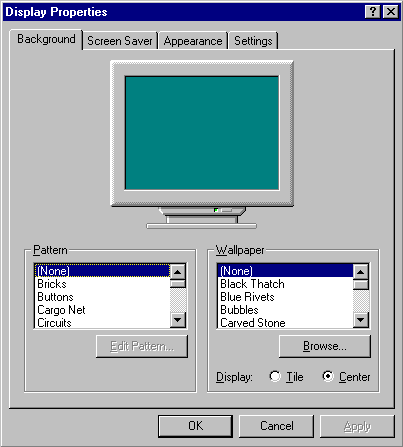
Wallpaper and Patterns
- Click on the Background tab. This is where you change the pattern on your desktop.
- Click on the various patterns listed in the Patterns field. The computer monitor shown will change to show you what the pattern looks like. To see the pattern on your desktop, click on the Apply button.
- Click on the various patterns listed in the Wallpaper field. The computer monitor shown will change to show you what the wallpaper looks like. To see the wallpaper on your desktop, click on the Apply button.
- Select Centre to see the wallpaper in the middle of your desktop only. Select Tile to cover the desktop with your wallpaper.
- When you have decided on a pattern and/or wallpaper, click on Apply to make the change to your desktop.
Screen Savers
- Click on the Screen Saver tab. This is where you set the screen saver for your computer.
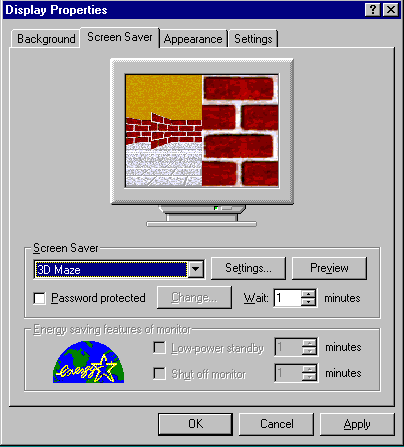
- Click on the black down arrow next to the Screen Saver field. A list of screen savers that come with Windows 95 will appear.
- Scroll through the list. To view a screen saver, click on its name. The screen saver will appear in the monitor shown in the dialog box.
- To see the screen saver on your screen, click on Preview. Your screen will black out and the screen saver will appear. To return to your screen, move the mouse.
- Click on the Settings button. This allows you to change elements of the screen saver such as colour, number of objects, etc. Make any changes you wish and then click on OK to return to the Display Properties dialog box.
- Just under the Settings button is a field called Wait. This lets you enter the number of minutes to wait before the screen saver comes on. Use the little black arrows next to the field to change the wait time to 5 minutes.
- Click on Apply to set the computer with your changes.
Individual Items
- Click on the Appearance tab. This is where you change the way that individual parts of your desktop look like.
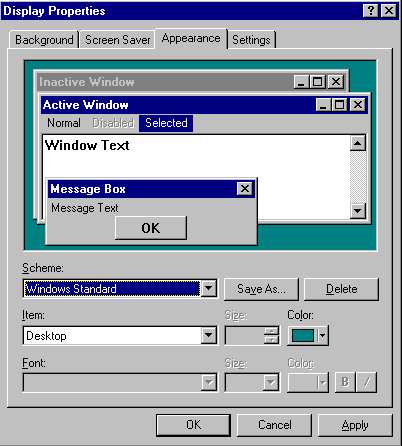
- Click on the black down arrow next to the Scheme field. A list of colour schemes will appear.
- Click on a colour scheme to see previewed in the top half of the dialog box.
- To change your computer to this scheme, click on Apply.
- The bottom two rows of the dialog box deal with each individual item on the desktop. Click on the black down arrow next to the Item field. A list of all the items you can change appears.
- Click on Desktop.
- To change the colour of the desktop, click on the black arrow next to the Colour field. A selection of colours will appear.
- Click on a colour to change the desktop to that colour. To set the colour yourself, click on the option More Colours and select a colour from those available.
- Select some other items and experiment with changing their appearance.
- Click on Apply for your changes to take effect.
- To save your colour scheme, click on the Save As button and enter a name for your scheme.
- Click on OK to save the scheme. Notice that it appears in the list of colour schemes available to you.
- Click on OK to close the dialog box.
- Click on the Plus tab. This is where you can change your icons.
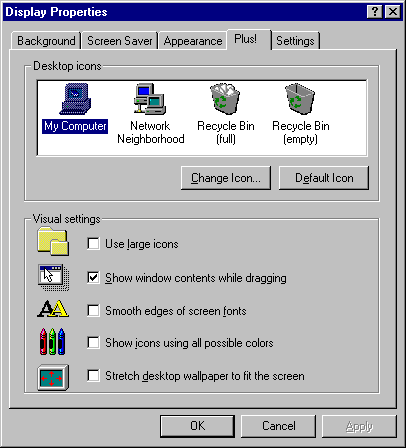
- To change an icon picture, select the icon you want to change in the top box. We will change the icon for My Computer.
- Click on the Change Icon button. The following box will appear.
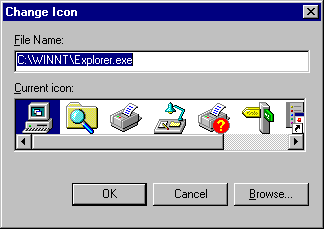
- Click on the picture you want to change the icon to, then click on OK. The icon on the Display Preferences dialogue box will change.
- Click on Apply to change the icon on your computer desktop.
- Click on the Default button to return the icon to its original picture.
- Click on Apply to change the icon on your computer desktop.
- Click in the box to select the first option from the list: Use Large Icons. The box will have a tick next to it when this option is selected.
- Click Apply to make all your icons larger.
- Deselect the option and click Apply to return the icons to their usual size.
The Settings tabs in this dialog box relates to the hardware settings of your computer. It is wise not to change these without consulting a technician first.
Starting Menu | Next Section